Showing posts with label Paper Creations. Show all posts

Friday, April 17, 2009

Quilt


I just had to show off my the quilt my friend Peg helped me make. My kindergarten class is studying the letter "Qq" this week, so I had them make this neat tulip block. Peg came in to show me how to put them all together to look like a quilt. I just love it! I know the kids will love it also. Thanks again Pegster! You rock!

Thursday, April 16, 2009

April Card Club (Church)...

I have not been to church cards since October of last year. So, I thought I best be high-tailing it over there and see what is happening. I'm really glad that I did. We made three cards and one was already made for us. Card club has not meet since December, due to bad weather. It was like a surprise to see what we would be making.


I really enjoyed all the cards. Have a great day.

Saturday, April 11, 2009

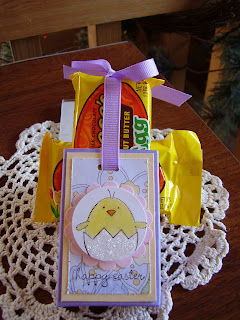
Easter Box...


I just love Reese's Peanut Butter cups. So, when the holidays roll around and they sell their product in cute little shapes I just have to buy them and of course eat them. However, I thought I best share, cause one only knows that I don't need to scarf the whole box of six down. So, I made up this little treat box slider. What a perfect way to send someone a little something and let them know that I'm thinking about them and wish them a Happy Easter. I used my new goodies I ordered from SU. Like the "Good Egg" Stamp set and then I used DSP from the Tea Party collection. If you would like to make one of your own or maybe a dozen or two, it is very simple.


Start with a piece of CS that measures: 6" x 4" Then score at 3/4" on the 4" side and 3/4", 2-3/4", 3-1/2", 5-1/2" on the 6" side. I glued the side the long side together, then I cut my slits to make the bottom. You should use the "Red" sticky tape to make it stay together, but I was out, so I just used snail adhesive. Easy Peasy and soooo cute!


I think this is my favorite Easter set right now. The little chick just makes me smile. Have a great weekend.

Friday, April 10, 2009

Easter Treats....


Wow! I have wonderful friends. Just look at the treats that I got to help celebrate Easter. I think back to the days that I hated chocolate. Hate chocolate? Really? I know! I use to tell people that it would give me a headache. I think I really thought it did, perhaps it might have. But, I really like it now. I mean really like it. In all shapes, flavors, and forms. So, when friends give me little treats containing chocolate, I get really HAPPY!


Wishing you all a happy and sweet day!

Tuesday, January 20, 2009

January Techniques Class

Yesterday I went to JaNell's SU workshop. The new technique we learned was "faux silk" super easy. Have you tried this? All you need to do is take a piece of tissue paper, stamp your image and crinkle the tissue paper up into a ball. Next, take your tissue paper and open it up and smooth it out. You are now ready to glue it to your paper. I was very excited because JaNell had found my new favorite glue stick. Scotch has made a glue stick called "Wrinkle-free" and it is awesome. It comes in a pack of two. I bought mine at Wal-mart for under $2.50. Look for it next time you go shopping, you won't be disappointed, I promise.


On this card we got to use SU "Valentine's Bundle" which I really like. The paper is from the pack called "Candy Lane" the colors and patterns all coordinate so nicely.


I liked all the things I made, but this little guy is just to cute. It looks like a 3x3 card, but really it is a treat holder. Yum! Chocolate! Okay, so if you would like to make one all you have to do is cut your paper 3" by 9" and then score at 3" and 6". Use a 1 3/8" circle punch to make your hole, so your treat can show through. We used yummy Dove caramel milk chocolate candies. We punched (scallop) out a piece of designer paper from the "Candy Lane" to put behind the candy. We did something different on the outside. We used two dimensionals at the very top of the Love stamped piece of paper, so that the ribbon can slide underneath it. I can't wait to make more of these. So cute and easy peasy. Love it!


Our free gift was this adorable Kit Kat bar. It was all wrapped up in "Bella Rose" designer series paper. Finished off with ribbon and "Love you Much" stamp, punched out. Super cute! Thanks JaNelle for another fun evening with friends and new SU products.

Monday, December 15, 2008

O Christmas Tree...

From the minute I saw this cute little tree, I knew that I had to make one. Since seeing him a couple of weeks ago, they have been popping up every where. So, I think a lot of other fine folks like him as well. This must mean I have good taste. =) So simple to make, just grab a scallop punch and punch a few circles and then cut your circles like triangles. I didn't have a star punch, so I just cut one out of yellow paper and then the trunk is made out of a piece of brown paper cut into a rectangle. I added brads for decorations. I think it turned out great. I'm planning on making more and putting them on my goodie trays. Speaking of goodie trays, I best get busy. No school today due to the weather and extreme cold. Yuck! So, one more day to play at home and make the best of it, as I can. I hope you have a great Monday.


Sunday, December 7, 2008

It's Beginning to Look Like a Winter Wonderland!

I spent a lot of time looking out the window today and enjoying the snow coming down. What a beautiful wintry sight. I loved it!!!! Yes, but only because I had no where to go and could stay home and enjoy it. =)
Friday was my first Christmas gathering of the year and it was SO fun! All of us stampers had a blast, the food was delicious and the company even better! I just love this time of year!


Today's post is the tags that we made at Janell and Yvonne's Holiday open house. They are so cute. I'm not sure which is my favorite, cause I love them all. If you would like to make some you can go to http://mercedesweber.blogspot.com/. This is the wonderful site that they got the ideas from. She has lots of neat ideas. Check her out.


Hope you are enjoying your weekend. See you next time.


Wednesday, December 3, 2008

Mrs. Mouse....


I just had to show off Peg's mouse she made. I think she is beautiful! Don't you think she would be the perfect spouse mouse for the little guy I made awhile back? =) She also made the calendar and the little bag to hold Post-it-Notes. What wonderful little gift's. Thanks Peg for sharing, your projects turned out great.

Thanks for stopping in and have a great day.

Friday, November 21, 2008

Here Comes Santa....

Brr...it is freezing out, that chill sure is in the air. I think winter is here to stay. So, if winter is here, you know what that means...yep the holidays, too. I really look forward to this time of year. I can't wait! This year I know, some people are really stressed out over not having much money...so I say make it a homemade Christmas y'all. I LOVE receiving gifts that people put their time and sweat into...it's the BEST!!!! So, starting out I made some tags to put on my presents. Don't you think he is going to look GREAT on the gifts under my tree?
I used Laurie's nestabilities to make his face, hat, and beard. Then added circle punches to make his face and then the Three for You flower punch to add fluff to his cap. Finished him off by adding stickles to his cap. I think he is sweet. Thanks for looking today and have a happy Friday.

Monday, November 17, 2008

Who Let the Mice Out....

I can remember as a child how fun it was to receive crafty things made out of candy canes. Do you all remember the candy cane reindeer? I remember the first time I got one from my dance instructor, I just loved it. It meant a lot to me and I still have it. So, when I saw this little mouse on Dawn's blog, I knew that I just had to make some. How cute of an idea for the candy cane to be his tail. Love it. Thanks for stopping by and I hope you have a great day.


Saturday, October 18, 2008

Cherry Jell-O Dessert


What a gorgeous fall day. I can't wait to get outside and play in the yard. I think today will be a perfect day to finish up cleaning around the house and yard. Well, I really should not say finish cause it really is never finished. But I'm sure you know what I mean.

Today's recipe is a new recipe, but a good one. I use to eat jell-o all the time when I was a kid visiting my grandparents. Well I have been craving it lately so this one hits the spot. I used the cherry stamp from SU "Tart and Tangy" set and also used the "Tart and Tangy" designer paper. The card stock is real red and a generic green color.

Have a great day!

Friday, October 17, 2008

Coffin Treat Box


I really like Halloween. In fact October, November and December are probably my favorite months of the year. Who wouldn't love the months were you get a ton of candy, a feast for a meal and then top it off by giving or receiving presents. So, when Halloween rolls around, one of my favorite sites to visit is Martha Stewart.com. She always has neat and exciting crafts that one can make for this spooky time of year. Naturally when I saw the pattern for the coffin I had to give it a try. Super easy! I love easy! If you would like to make one head over to her website and get yourself the pattern. The top and bottom are cut from a 8 1/2 X 11 piece of black card stock. The are lined with K & Company designer paper. I wanted the outside to be decorated so I added the skeleton stamp from "Batty for You" stamp set. I then tied it together with natural hemp twine. I can't wait to make a couple of more, but I ran out of black card stock. I think I need to go shopping. Oh, bummer. LOL

Tuesday, October 7, 2008

Candy Test Tube Holder...

A few weeks back, I went on a road trip to St. Cloud to have lunch with my aunt and uncle and I made a pit stop at Micheal's and Crafts Direct. I had not been to Crafts Direct new location, so it was a huge treat. I just wish I would have had more time and tons of money. I know, I will keep dreaming. When I was at Micheal's my nephew, Riley saw some test tubes and he told me to buy them. I had no idea what to do with them, but I went ahead and got them. Well, funny story after that I noticed many other crafter's also purchased these and made cute candy holders out of them. I borrowed the pattern of the test tube holder from Lisa Somerville. These were fun to make.

Thanks for looking today and have a great Tuesday.

Saturday, October 4, 2008

Pixy Stix Monsters...

I was cruising the candy isle yesterday, when I saw these sweet Pixy Stix's and so I thought I would pick some up and get busy using my favorite stamp set right now. Batty for You stamp set is a favorite of mine right now. Well, okay, it maybe my only stamp set, but hey least I have a favorite. LOL I used SU paper and ink in the following colors: Only Orange, Tempting Turquoise, Real Red, Orchid Opulence & Pumpkin Pie. I attached the scallop to the Pixy Stixs with glue dots and then used a dimensional to hold the scallops together. I also added some Martha Stewart glitter to the ghost. Isn't he so cute.

Thanks for stopping by....see you next time.

Thursday, October 2, 2008

Halloween Treat Holders...


Have you seen the new Cool Ghoul colors of M & M's? Well, they are just so electrifying. So I thought I would make them a cute little holder to house them in. This little treat holder would be cute in all kinds of colors. I had some left over orange, so that is what I made mine out of. But, wouldn't black or purple or lime green look super cute? If you would like to make one of your very own you will need a piece of cs cut at 6" by 2 3/4", then score at 2", 3", and 5". The little black piece of paper is 2 3/4" by 1 1/2". I would love to have the new scallop punch from SU for this piece, I used my corner punch for mine and it is a little big. The ribbon measures 5" long. The stamps are from SU "Batty for You" set.

Thanks for stopping in today. Happy paper making!

Saturday, September 27, 2008

Yummy Mummy...

Is there such a thing as a sweet mummy? Well today there is! LOL I had a rolls of Lifesavers lying around the house, so I decided to turn it into a mummy. I think it turned out just cute. What do you think?

This sweet and tasty little mummy is all bandaged up in Very Vanilla paper. I tore ten strips of paper 3" long to cover the roll. I then added brown chalk to the strips to help his bandages look old and aged. I used two small paper punches for his eyes and a marker to make the smallest circle.

Thanks for peeking in today and I hope you have a sweet day!

Wednesday, September 3, 2008

Back to School Gear...


So, in respect of school starting this week, I thought I would make a little backpack to haul all my goodies. Park Rapids, we have a problem! For some reason all my stuff just won't fit. LOL When I first saw this cute little backpack I just knew that I would be finding myself casing it. However, mine did not turn out one spec cute. I'm only posting this to let you all know that I'm only human. Oh, you already knew that. Go figure. No, really, it is a super cute idea and it has so much potential. Here is the problem I find. The culprit is the paper. I really like this Debbie Mumm paper, but its just not right for this project. So if you are wanting to out do me on this project, which by the way would not be a challenge you can head on over to Stamp Happens to make one for your very own self. Thanks for looking and happy stamping.

Sunday, August 24, 2008

Box in a Bag...the Little Guy

I had to. I just had to. Make a box in a bag in a small version, that is. Don't you think everything (ok, a lot of things) looks cuter when it is little? Well I know I do. So if you would like to whip one of these up here is the info. I used Real Red card stock from SU, Chalkboard designer paper from Provo Craft and purchased at Michael's , and "ruler" ribbon (Thanks Peg). I cut the designer paper at 2-1/2" x 6-1/2". The square to make the "box" bottom measures 2-1/2" x 2-1/2", scored at 1/2" on each side. The scalloped strip is 1/2" wide and 2 1/2" long. You can fit about five little candy bars inside the bag. What teacher wouldn't want one of these? Speaking of teachers, can you believe school starts in just one week. Where did the summer go?

Speaking of little things, I would like to introduce you to "Ethel." She is sooo cute! My Aunt and Uncle just got her and they stopped over to my house for dinner. I just adore her.

I just couldn't resist taking a picture of her favorite napping spot, next to one of my flower gardens. However, she did not get much rest with my four nephews arguing over her. Poor little girl.

One more baby to share with you. My nephew Bridger caught a baby salamander. I have not seen one like this before. It was black with small spots of blue on it. It was neat looking. I just love the expression on Bridgers face. Priceless!

Well I hope you had a great weekend. Take care and happy trails.