Showing posts with label Stampin' Up. Show all posts

Tuesday, November 17, 2009

November Card Class

Last night was our November Card class at JaNells. Yvonne and JaNell put together some fabulous cards for us to make. For the first card we used Stampin' Up's new stencils. Have you seen these yet? This was the first for me. I have to admit that at first I was a bit sceptical about them and then Yvonne should us this card. I feel in love with it! We used brushed gold CS for the card and the top of the ornament. I had not used this paper before, so that was a treat for me. I like!

The second card we made was all about Dasher. We used gold ink on this card. I loved the colors on this card. I also loved the the polka-dot grosgrain ribbon. I will have to add this to my ever growing wish list.


Our last card was made using the Merry Moments paper from SU. I felt like a child again, because it reminded me of wallpaper my parents had in their bedroom. It was not the same color, but the print was similar and it had the same soft texture to it. How fun to travel down memory lane. Our second technique we learned was about embossing. We first stamped our image in VersaMark and then we stamped it in Real Red Classic Ink, we finished off by adding clear Embossing Powder and then we set it using the Heat Tool. Easy peasy lemon squeezy.


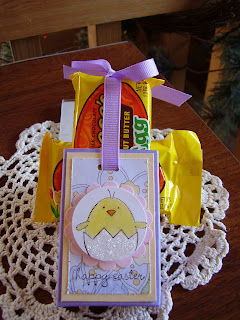
We received the cutest little gift. It was filled with candy corn. Yum! I love the stuff and of course I already ate mine. *)


Thanks Yvonne and JanNell! I loved all the projects. Job well done!

Wednesday, July 22, 2009

July Hostess Club/Technique Class

Monday nights class was all about Top Note magic. We covered three techniques, but that doesn't even put a dent in what you can do with this handy dandy little guy. We also used some of the new in colors. At first I was not sure of these colors, I thought they were so bold and bright, but after creating with them...well, all I can say is they certainly have grown on me.
We made three make-n-takes.


This card was made out of Razzleberry Lemonade DSP and then Crushed Curry and Melon Mambo CS. We colored the image from the Razzle Dazzle set with the new in color markers. Tied it up with the new Crushed Curry polka-dot ribbon.


I have been wanting to make one of these cute little purses. I just love the color on this one. We used Rich Razzleberry CS and then Patterns Designer Series Paper in Rich Razzleberry. We also used the jumbo eyelets with the crop-a-dile. Easy-peasy! How cute!!!


For the last card we took 1 inch little squares from the Razzleberry Lemonde DSP and glued them down on white CS and then ran it through using the Top Note Die. It was neat to see every one's cards, cause no two cards where alike. I just love my little quilt, I think it turned out fabulous.


We ended the night with yummy fruit pizza and three great projects. I can't wait to make some more purses, I just think they are the bomb diggety dog.

Have a great Wednesday everyone!

Saturday, April 11, 2009

Easter Box...


I just love Reese's Peanut Butter cups. So, when the holidays roll around and they sell their product in cute little shapes I just have to buy them and of course eat them. However, I thought I best share, cause one only knows that I don't need to scarf the whole box of six down. So, I made up this little treat box slider. What a perfect way to send someone a little something and let them know that I'm thinking about them and wish them a Happy Easter. I used my new goodies I ordered from SU. Like the "Good Egg" Stamp set and then I used DSP from the Tea Party collection. If you would like to make one of your own or maybe a dozen or two, it is very simple.


Start with a piece of CS that measures: 6" x 4" Then score at 3/4" on the 4" side and 3/4", 2-3/4", 3-1/2", 5-1/2" on the 6" side. I glued the side the long side together, then I cut my slits to make the bottom. You should use the "Red" sticky tape to make it stay together, but I was out, so I just used snail adhesive. Easy Peasy and soooo cute!


I think this is my favorite Easter set right now. The little chick just makes me smile. Have a great weekend.

Wednesday, March 11, 2009

On Monday night my friend Laurie had her first SU workshop. It went great! However, the weather did not cooperate and so four friends were not able to make it. However, she still had a great turn out with seven of us. It was fun! Her workshop was a 5-10-15 class. I had never heard of this. So, for five dollars you could make 5 cards, each taking 10 minutes to make....or get the cards free if you placed a $15 order. What a great concept. Seeings how I like to talk and the people that I sat with like to talk, it did take us a bit longer. Oh, darn! =) Actually all of us would have loved to stay longer, but with the wind howling and the snow coming down, we thought it was a good idea to get home. So, we did not get one project done.

I liked all the cards I made, buy my favorite card of the night was this little guy. We used the Good Egg stamp set. We colored the chick using the blender pen in the So Saffron chalk. Then used the two-way glue pen to add dazzling diamonds glitter to the eggshell. I think he turned out eggsellent cute!

I love Bella Rose paper, so of course I love this card. It was fun bending up the petals from the "Flower, Daisies #2" die. We used a Scor-Pal to add the lines in the leaves. LS had the stuff all cut out for us, what a treat.

This card is so nice and clean looking. Looks simple, but let me tell you I had the hardest time getting the roller to go on evenly. I'm in love with all the trees in the SU catalog. I want all the sets, this one included. 
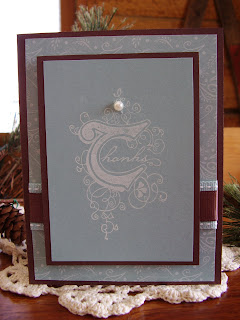
This last card is really neat, too. I told you I really liked all the cards. There is something about blue (Bashful Blue) and brown (Chocolate Chip) that just makes me fall in love. The stamp set is called "Illuminations" and I would never have given it a second look in the catty, but using this set changed my mine. Funny how going to workshops will do that for a person. I also like how the layering of card stock provides color and interest.

Well I had a great time and look forward to the next gathering. Oh and you should go to Laurie's blog and write down her recipe for the most amazing dessert she served. It was heavenly. I love making Triffles and eating them more, so I will be enjoying this one often. Have a great day everyone.

Tuesday, January 20, 2009

January Techniques Class

Yesterday I went to JaNell's SU workshop. The new technique we learned was "faux silk" super easy. Have you tried this? All you need to do is take a piece of tissue paper, stamp your image and crinkle the tissue paper up into a ball. Next, take your tissue paper and open it up and smooth it out. You are now ready to glue it to your paper. I was very excited because JaNell had found my new favorite glue stick. Scotch has made a glue stick called "Wrinkle-free" and it is awesome. It comes in a pack of two. I bought mine at Wal-mart for under $2.50. Look for it next time you go shopping, you won't be disappointed, I promise.


On this card we got to use SU "Valentine's Bundle" which I really like. The paper is from the pack called "Candy Lane" the colors and patterns all coordinate so nicely.


I liked all the things I made, but this little guy is just to cute. It looks like a 3x3 card, but really it is a treat holder. Yum! Chocolate! Okay, so if you would like to make one all you have to do is cut your paper 3" by 9" and then score at 3" and 6". Use a 1 3/8" circle punch to make your hole, so your treat can show through. We used yummy Dove caramel milk chocolate candies. We punched (scallop) out a piece of designer paper from the "Candy Lane" to put behind the candy. We did something different on the outside. We used two dimensionals at the very top of the Love stamped piece of paper, so that the ribbon can slide underneath it. I can't wait to make more of these. So cute and easy peasy. Love it!


Our free gift was this adorable Kit Kat bar. It was all wrapped up in "Bella Rose" designer series paper. Finished off with ribbon and "Love you Much" stamp, punched out. Super cute! Thanks JaNelle for another fun evening with friends and new SU products.

Sunday, December 7, 2008

It's Beginning to Look Like a Winter Wonderland!

I spent a lot of time looking out the window today and enjoying the snow coming down. What a beautiful wintry sight. I loved it!!!! Yes, but only because I had no where to go and could stay home and enjoy it. =)
Friday was my first Christmas gathering of the year and it was SO fun! All of us stampers had a blast, the food was delicious and the company even better! I just love this time of year!


Today's post is the tags that we made at Janell and Yvonne's Holiday open house. They are so cute. I'm not sure which is my favorite, cause I love them all. If you would like to make some you can go to http://mercedesweber.blogspot.com/. This is the wonderful site that they got the ideas from. She has lots of neat ideas. Check her out.


Hope you are enjoying your weekend. See you next time.


Tuesday, November 18, 2008

November Techniques Class...

Last nights class was titled "Surprise Class of the Year" and it lived up to its title. The first person who came into the stamp room received the cutest little Santa that Yvonne made using the Big Shot. Audrey (first order) and Gail (drove alone)also received one. Santa was made using the scallop die for his beard and the pillow box die as the backing/hat/holder for the treats. He was just adorable, and I'm sad that my picture did not turn out better.


We made three Christmas cards, which I adore. The first one we made was using the "Top Note Die". I love this die, you can use it for so many things. We embellished it with a felt flurry, rhinestone brad and the new Riding Hood Red ribbon. Love it! Of course, I had to buy some of that ribbon...I just like it.


The second card used some of the new Ski Slope DS Paper. We stamped our image onto Craft paper. I have never used SU craft paper, but I really liked it. I just love the color combination of this card. The picture looks so inviting.


The last card is very professional looking. All of us, just loved it. More Ski Slope DS paper and the tree is from the Snow Swirled set. I added some stickles to my card when I got home, so it glistens ever so gently. We also used the Cuttlebug on the envelope flap, what a neat idea.


Lastly, this cute little sour cream container contains M&M's. Yum, chocolate! The container is made out of vellum card stock. The tree is the same tree as the card above, but is embossed in silver powder. This picture does not do justice either, sorry.


I had another fabulous night, thanks ladies for all that you do. Job well done!

Thursday, October 23, 2008

October Techniques Class...

On Monday night I went to a Stampin' Up! Techniques class at Demonstrator JaNell's beautiful home. We made four make-n-takes. The techniques covered were: Die cut masking and Faux diamond dust. We also got to use the new Big Shot. It was a lot of fun. JaNell and her mom Yvonne are awesome, not to mention very creative. You ladies rock! However, I have to admit even though the cards are always wonderful-its the chocolate with the clever packaging that keeps me coming back. LOL This month they gave each of us a owl treat bag made with the top note die. Isn't he a HOOT?


All four cards were fun to make. The card with the scallop was embossed with Iridescent Ice Embossing Powder. This technique/card was probably the most fun for me, just because it contained shine. It sparkles just like if you use glitter, but with less mess. On the card with the Upsa Daisy stamp, we used the rubber left over after you punch out the image. What a perfect way to add color in a controlled manner. The card that is I think More Mustard(?) was stamped with Seasons of Friendship set. The last card is a gift card holder. What a neat idea. I would love to make some of these and hang on my Christmas tree this season.


I had a wonderful evening playing with paper and learning new techniques. Thanks ladies! Thanks LS for driving and making wonderful treats for all of us to enjoy. It was all delish!

Saturday, October 4, 2008

Pixy Stix Monsters...

I was cruising the candy isle yesterday, when I saw these sweet Pixy Stix's and so I thought I would pick some up and get busy using my favorite stamp set right now. Batty for You stamp set is a favorite of mine right now. Well, okay, it maybe my only stamp set, but hey least I have a favorite. LOL I used SU paper and ink in the following colors: Only Orange, Tempting Turquoise, Real Red, Orchid Opulence & Pumpkin Pie. I attached the scallop to the Pixy Stixs with glue dots and then used a dimensional to hold the scallops together. I also added some Martha Stewart glitter to the ghost. Isn't he so cute.

Thanks for stopping by....see you next time.

Thursday, August 14, 2008

A Bushel of Berries

Strawberries, anyone? I created this little weaved basket or is it bushel (wink) by using a technique I learned in first grade. We are going old school, here people. My strips of neutral card stock were cut to about 3/8" each wide by 31/4" long. I distressed the edges with brown chalk. I weaved the paper over and under repeatedly until there was enough of a weave to cover the front of my card base. I then adhered the weave piece on top of the card, and then trimmed around the edges.

OK, so here is the part that takes plenty of patients. If you do not posse any, you need to stop right here. I repeat....this card may not be for you. I stamped twelve strawberries. Whats the big deal you say? Well, color the stamp with a red marker, and then a green marker, and then huff on the stamp to moisten it, and then stamp on paper. Don't forget to cut each one out. Personally, I thought it was a lot of work-but just look at it. How cute! Well worth it. I also stamped the strawberries repeatedly overlapping some to form a small cluster. I adhered the berry cluster to the card, then glued down some individual berries over my overlapping stamped images. I used some dimensionals to give it a little popped up feeling or I'm falling, please feel free and eat me.

Last but not least I took 2 small pieces of brown ribbon and created handles on each side. The sentiment inside could say "Your so Sweet" or "Thanks a bunch" or whatever your little heart desires. I need to thank Linsey for giving me the idea for this delicious card. I bought a nail file and it has strawberries on it and then I got to thinking about my favorite stamp set and then look what happened, a beautiful card was born.

TFL (thanks for looking), hope you liked it and will want to make one of your own! Happy Stamping!
Supplies:
Stamps: SU Tart and Tangy
Ink: Real Red and Glorious Green
Ribbon: Brown
Paper: Neutral CS